
After I developed great gluten-free recipes for bread, scone, cake, pie crust, muffin, crackers and even pizza dough for my son, Galen, giving up wheat was easy, with just one exception: sourdough bread.
If you love the tangy flavor of sourdough (and the health benefits of fermented foods) as much as I do, I have great news for you: it’s easy, although a bit time-consuming just at first, to make wonderful gluten-free (GF) sourdough bread.
I’ve done the research and have combined the information in several excellent books on GF bread-baking* to make the process easy, fun, and most importantly, the result, consistently delicious, for you. Follow my directions below for a reliable, hearty GF sourdough starter and two foolproof loaves of GF sourdough bread—one lighter, one heartier.
Before you start, you need to create a sourdough starter. Here’s how to get yours off to a robust start, followed by two surefire recipes for GF sourdough bread you – your family, friends, and your bones — will love.
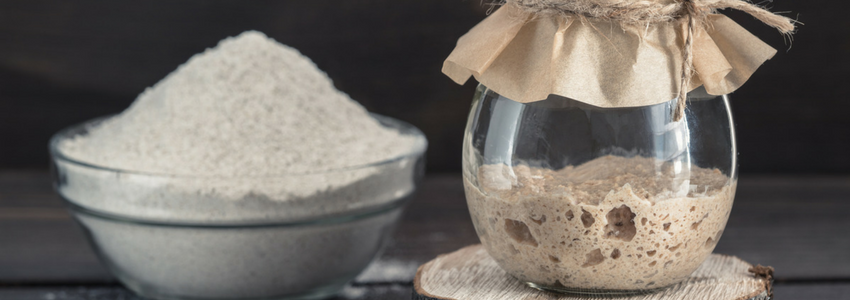
Make Your Own Sourdough Starter
After spending several weeks experimenting with the best (least costly–both financially and time-wise—and easiest) way to create a robust sourdough starter, mine has become a family pet. I’ve named her “Gertrude.”
Currently, Gertrude’s sleeping in my refrigerator, but when put in a warm place and awakened (by stirring in a ½ cup of water and a ½ cup of GF flour), she has quite the bubbly personality. And she’s a very low maintenance pet. All she needs is to be taken out of the refrigerator, put somewhere warm (~70 degrees) and fed ½ cup of water and a ½ cup of GF flour. Then she usually perks right up and, in 4 hours, is ready to create a loaf of a wonderful loaf of sourdough bread. If she’s still getting her act together, a second feeding (another ½ cup flour and just enough let it mix in well – so somewhere between ¼ and 1/3rd cup), will do the trick.
Gertrude (Sourdough Starter)
Ingredients
- 1 tbsp dry yeast active (1 packet= 1 tbsp)
- 1 cup coconut milk organic (not canned), room temperature (if you tolerate dairy, cow’s milk can be substituted)
- 1/2 cup sorghum flour (oat or quinoa flour can be substituted)
- 1/2 cup millet flour oat, teff or quinoa flour can be substituted)
- 1 tsp maple syrup or honey
Instructions
- In a glass 1 or 2 quart-jar, or in a glass bowl that will hold 4 to 8 cups, add the yeast to the room temperature milk and stir with a wooden spoon to dissolve the yeast. The spoon must be wood, not metal; yeasts do not like metal – it really stresses them out.
- Add your flours and maple syrup and stir to mix well.
- Cover the jar loosely with a thin, breathable dish towel (that old, worn out, but clean, favorite dish-towel you haven’t been able to bring yourself to consign to the pile of rags in the garage) or a piece of cheesecloth. If you use cheesecloth, it won’t be long enough to drape fully over the top of the jar, so keep it in place with a rubber band).
- Let the jar sit in a warm place (around 70-75 degrees) away from drafts for 2-3 hours. Now that Fall’s cool weather is here, I create a warm place for my starter by putting it next to the corner wall of my kitchen counter and placing our slow cooker, which I leave on its “warm” setting, in front of it. You could set your starter on top of the refrigerator or on your stove top, which will warm up if you turn on the oven at its lowest temperature.
- After 3-4 hours, your starter should start to bubble and will appear pockmarked on the surface. If it hasn’t already, in another hour or so, it will develop a thin layer of clear liquid on top. This thin liquid layer is called “hooch,” and is a good sign that your yeast has fed and produced acetic acid, the byproduct of yeasts’ fermentation that gives sourdough its tangy flavor. Just stir to incorporate the hooch back into the mixture, cover the jar (or bowl) again loosely, feed your starter with another ¼ cup of flour (and another ¼ cup of water if adding ¼ cup of flour makes the starter too thick to stir well), and let it sit out overnight. Remember to keep your starter warm (70-75 degrees).
- For the next 2 days, repeat this procedure. Once in the morning, once in the evening, stir the hooch back in, mix in ¼ cup of flour and if needed, ¼ cup of water, cover the starter loosely and leave it on the counter in a place where it will be kept warm (~70 degrees).
- The morning of Day 3, if you’re not going to bake a loaf of sourdough bread that day, just transfer your starter to the refrigerator. It will go into hibernation mode until it is removed from the refrigerator and fed. And then it will need about 4 hours to become bubbly and active again.
Notes
Nutrition
Feeding Your Sourdough Starter
-
- At least 4 hours before you will want to use your starter, take it out of the refrigerator, uncover it and stir with a wooden spoon until the hooch is fully incorporated, and the starter is smooth.
-
- Remove 1 cup of the starter and discard it. This sounds wasteful, but what you are trying to do is concentrate the yeast, so you have a very potent starter. (And you can always give this cup of starter to a friend, who can use it to create another starter.)
-
- Add 1 cup of slightly warm water (just test on your wrist, about 100 degrees is what you want and will feel just slightly warm) and 1 cup of flour (you can use a cup of any of the flours listed above or a half cup each of two of them). Stir with your wooden spoon to combine until smooth. Cover loosely and let the starter sit out in a comfy spot (around 70 degrees, no drafts) for at least 4 hours, or overnight. Once it’s bubbling and thick, it’s fed and ready for baking. If it’s not already bubbling in the morning, feed it again with ½ cup flour and ¼ cup water and give it 3-4 more hours to become active.
- Take out the amount of starter your recipe calls for (typically 1 cup), feed the remaining “mother” starter with ½ cup warm water and 1 cup flour, stir with a wooden spoon to combine, cover loosely and put back in the refrigerator. If the result is too thick, just add ¼ cup more water.
OK, from now on, all you’ll need to do is feed your starter about once a week 4 hours before you want to use it. And you’ve got your 1 cup of active starter, so you are ready to bake wonderful GF sourdough bread!
Good for Your Bones:
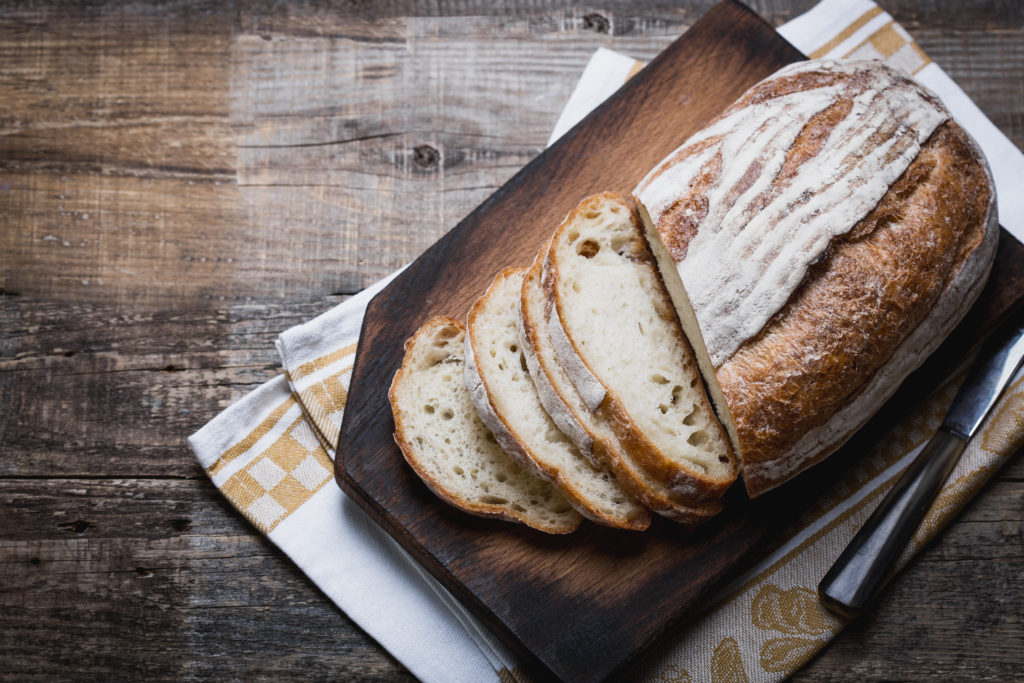
Light and Lofty Sourdough Bread
Ingredients
- butter pastured or vegan to coat
- 2 tsp chia seeds
Wet ingredients
- 1 cup sourdough starter
- 1- ½ cup coconut milk organic (the kind in cartons in the refrigerator section of your grocery store, not canned)
- 2 tbsp maple syrup organic, Grade B if available
- 3 tbsp olive oil extra virgin organic
Dry ingredients
- 1 cup millet flour
- 1/2 cup sorghum flour
- 1/2 cup arrowroot
- 1/2 cup tapioca
- 1/2 cup potato starch
- 1/4 cup flax seed meal
- 2 tsp xanthan gum
- 2 tsp salt
Instructions
- Prepare your loaf pan by generously coating it with pastured butter or a vegan butter replacement. I use a Pyrex loaf pan, which measures 9×5 inches.
- In a glass measuring cup, mix your 2 teaspoons of chia seeds into a ¼ cup of room temperature water.
- Let sit for 5-10 minutes while you assemble the rest of your ingredients. The chia seed/water mixture will thicken and form a gelatinous goop that will help bind the flours together and add healthy fiber to your bread.
- In a large glass or crockery bowl, add your wet ingredients and combine, using your mixer on its lowest level.
- In a medium-sized bowl, add your dry ingredients and stir to combine.
- Add the chia seed mixture to the wet ingredients mixture.
- Then add the dry ingredients to the wet mixture, adding a ½-1 cup at a time into the wet ingredients. Use your mixer on medium speed to combine everything thoroughly – for 4-5 minutes. A fairly thick, sticky dough will form.
- Using a spatula, scoop the dough into your prepared loaf pan and spread it out evenly. Cover loosely with a thin cotton dishtowel or cheesecloth. Now let the dough ferment and rise for at least 8 hours. This is the minimum time to develop any sourdough flavor. The longer the starter’s yeast works on the flours in the dough, the richer the sourdough flavor, so, after all your effort to create outstanding sourdough bread, don’t bake it until the dough has fermented at least 10-12 hours or overnight.
- Remove the loose covering and bake the loaf at 400 degrees for 50 minutes to 1 hour. Check at 50 minutes. It’s done when the crust is a golden brown and a knife or wooden skewer inserted into the loaf comes out clean.
- Remove the loaf from the oven, turn it out onto a cooling rack (because you buttered the loaf pan, your bread will fall right out), and let cool fully – for about 1 hour – before slicing. Letting it cool properly is important; the bread will contain excess moisture that will evaporate while it’s cooling. Skip this step, and you will have soggy bread.
Notes
- Calories: 147
- Complex Carbs: 24g
- Protein: 2g
- Fiber: 3g
- Fats: 5g (2.24g monounsaturated, 0.65g omega-3, omega-6 0.27g, saturated 1g)
- Calcium: 18.45 mg
- Magnesium: 4.24 mg
- Potassium: 13.79 mg
- Iron: 0.72 mg
- Vitamin B12: 27 mcg
- Vitamin D: 11.34 IU
- Vitamin A: 69.69 IU
- Vitamin K: 1.62 mcg
- Vitamin E: 37 mg
- Folate: 2.46 mcg
- Choline: 2.49 mg
Nutrition
I definitely learned all of the above the hard way. Now, the morning prior to baking, I take my starter out of the refrigerator and feed it, then feed it again in the afternoon, and prepare my dough in the evening after dinner. I let the dough ferment and rise overnight, then bake my bread first thing the following morning.
If you’re up by 7:30 AM, your bread will be done and ready to leave out to cool by 8:30 AM. You can slice it by 9:30 AM or just wait until you get home.
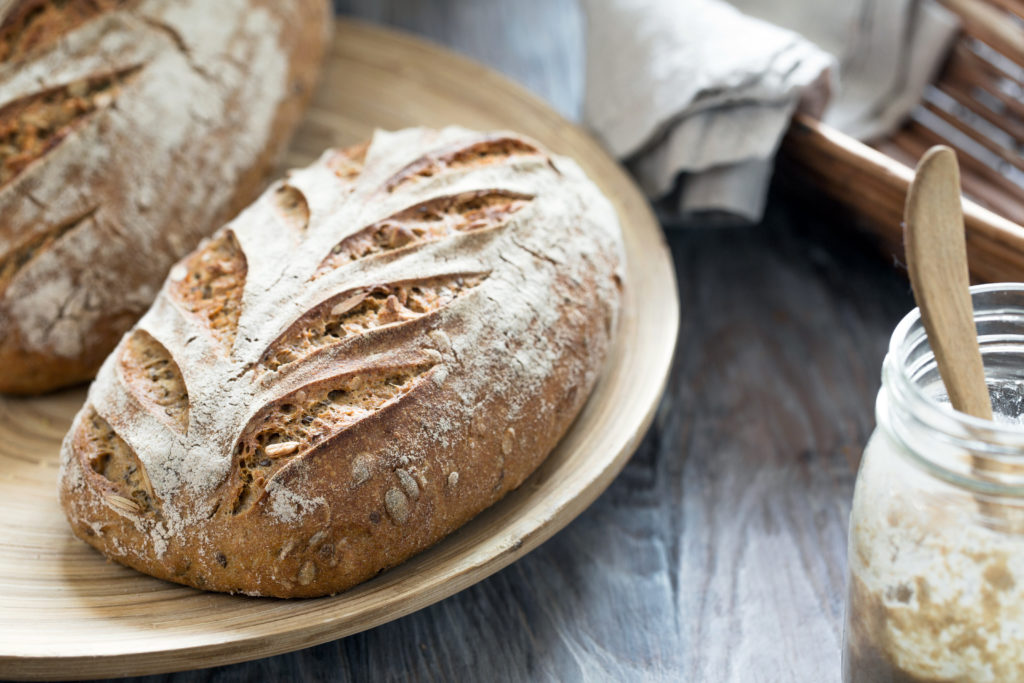
Good for Your Bones:
Hearty and Dark Sourdough Bread
Ingredients
- butter pastured or vegan to coat
- 2 tsp chia seeds
Wet Ingredients
- 3 eggs free range organic
- 1/2 cup coconut milk organic(in a carton, not canned, or full fat cow’s milk, if tolerated)
- 1 cup sourdough starter
- 1/4 cup water & chia seeds (the mixture you prepared below)
- 1 tbsp maple syrup
Dry Ingredients
- 1 cup millet flour (mix in ½ cup at a time)
- 1/2 cup sorghum flour
- 1/2 cup teff flour
- 1/2 cup flax seed meal
- 1/2 cup potato starch or tapioca flour
- 1/2 cup arrowroot
Instructions
- Prepare your loaf pan by generously coating it with pastured butter or a vegan butter replacement.
- In a glass measuring cup, mix 2 teaspoons of chia seeds into a ¼ cup of room temperature water.
- Let sit for 5-10 minutes while you assemble the rest of your ingredients. The chia seed/water mixture will thicken and form a gelatinous goop that will help bind the flours together and add healthy fiber to your bread.
- In a large glass or crockery mixing bowl, use your hand-held mixer to combine the wet ingredients.
- Mix in your dry ingredients, a little at a time, to thoroughly combine (this takes about 4-5 minutes).
- The thickness of your dough will vary depending upon where you live and current climate conditions. If the dough isn’t quite thick enough (you want a consistency a bit heavier than cake or quick bread batter), mix in an additional ¼ cup of either sorghum flour or – for a delicious nutty flavor – hazelnut meal. I haven’t tried chestnut flour, but expect it would work beautifully as well.
- Using a spatula, scoop the dough into your prepared “buttered” loaf pan and spread it out evenly. Cover loosely (I use an old, thinned out, cotton dish towel), and let ferment and rise overnight.
- The next morning, remove the covering, transfer the bread to your oven and bake at 400 degrees for 50 minutes to 1 hour.
- Check at 50 minutes. It’s done when the crust is a golden brown and a knife or wooden skewer inserted into the loaf comes out clean.
- Remove the loaf from the oven, turn it out onto a cooling rack (because you buttered the loaf pan, your bread will fall right out), and let cool fully – for 1 hour – before slicing. This is important; the bread will still contain excess moisture, which will evaporate while it’s cooling. Skip this step, and you will have soggy bread.
Notes
- Calories: 166
- Complex Carbs: 26g
- Protein: 6g
- Fiber: 5g
- Fats: 5g (0.8g monounsaturated,2g omega-3, omega-6 >0.01g, saturated 0.32g)
- Calcium: 32 mg
- Magnesium: 1.5 mg
- Potassium: 5.28 mg
- Iron: 2 mg
- Vitamin B12: 0.09 mcg
- Vitamin D: 3.65 IU
- Vitamin A: 88 IU
- Vitamin K: 0.01 mcg
- Vitamin E: 1.10 mg
- Folate: 0.73 mcg
- Choline: 0.1 mg
Nutrition
It’s okay to leave your bread out for several hours after baking. Sourdough bread keeps very well and will be fine for several days if not refrigerated. If refrigerated, sourdough will keep for at least a week to 10 days.
You Can Feel Good About Eating These GF Sourdough Breads
Not only are they loaded with many nutrients your bones require, (as the nutrient lists show), but the fermentation process that creates sourdough also:
-
- Pre-digests the grains, which makes the minerals they contain much more bioavailable.
-
- Produces gut-friendly lactobacillus bacteria, which not only crowd out unfriendly bacteria that wreak havoc in the digestive tract, but themselves produce B12 and other B vitamins, improve immune function and lessen inflammation.
- Produces acetic acid, which in addition to being responsible for the unique flavor of sourdough, is a natural preservative that inhibits the growth of mold, so your sourdough will stay fresh longer — in the unlikely event any is still around after a couple of days.
Sorghum, a Grain with Unique Bone-protective Benefits
Sorghum has special health-protective properties superior to those of other staple grains – insights just confirmed in a meta-analysis of 19 studies published in the September 2016 issue of Nutrition Reviews.
The results of current studies indicate that sorghum helps maintain healthy blood sugar and insulin levels and decreases oxidative stress. When sorghum is consumed, the increase in blood sugar that typically occurs after a meal is up to 26% less compared to the increases in blood sugar seen after consuming wheat, corn or rice.
Not surprisingly, since blood sugar rises so much less, the amount of insulin produced to usher that sugar inside our cells is also significantly lower – a full 55% lower when sorghum is consumed compared to wheat, maize or rice!
In addition, after sorghum is eaten, levels of beneficial polyphenols are higher, while those of markers of oxidative stress (free radical damage) are much lower:
-
- Two hours after eating pasta containing 30% red sorghum, a 24% increase in blood levels of protective polyphenols was seen. In contrast, the consumption of wheat pasta caused a 1% decrease in polyphenols over the same 2-hour time period.
-
- In addition, a 34% increase in the activity of a powerful antioxidant our bodies produce called superoxide dismutase (SOD) was recorded after consumption of red sorghum pasta, while consumption of wheat pasta produced a puny increase in SOD of just 0.7%.
- Lastly, protein carbonyl, a marker of oxidative stress/free radical damage to proteins in the body, decreased by 26% after red sorghum consumption but increased by 8% after wheat pasta consumption.
Why is This Important for the Health of Your Bones?
High blood sugar and high insulin levels promote oxidative stress, and all three (high blood sugar, high insulin levels, oxidative stress) promote inflammation. When the foods we consume at every meal trigger large increases in blood sugar and insulin, and cause oxidative stress, we are constantly in a state of low-grade inflammation. And when chronic, inflammation, even low-grade inflammation, activates osteoclasts, causing bone loss.
*If you’re looking for more info, I highly recommend:
- Nicole Hunn’s Gluten-Free on a Shoestring Bakes Bread, Da Capo Lifelong, 2013.
- Jennifer Katzinger’s Gluten-Free and Vegan Bread: Artisanal Recipes to Make at Home, Sasquatch Books, 2012.
- Sharon Kane’s The Art of Gluten-Free Sourdough Baking, Cultures for Health.com
[recipe_widget]


Lynn
May 31, 2018 , 7:32 amSounds so interesting. Had thought to try heirloom wheat as sourdough (going thru hours of rising) but trying other grains or seeds might work also. Had got so used to SCD for healing digestion that bread actually look like a dried up old thing. Had read something last week about sprouted sorghum to be careful with, think for thyroid health. Healthy bone studies sound encouraging. Have read that sulfites are sometimes added to potato or tapioca starch so contacting company in case allergic to it (or get organic or make it yourself) . Thank you for the recipe